Deploy Helm Chart
This section introduces that how you deploy Helm Chart into multi-environments and clusters.
The typical usage of deploying Helm Chart is to integrate middleware, many from in bitnami or open-source application tools such as Gitlab, Jenkins in Helm Official Repo. KubeVela can help you easily deploy these applications to any managed cluster and manage them.
Starting from here, you will learn to use the KubeVela Addons to install plug-ins. The Helm Chart is currently supported by the FluxCD addon. In addition to the Helm Chart, FluxCD addon also supports Kustomize.
Before starting
- Choose a Helm Chart you needed. Or in this case, we take bitnami/redis as an example.
- Ensure that the cluster you deliver has a usable default StorageClass. Most of our delivery middleware requires data persistence, and the default StorageClass is needed to allocate PV.
- Enable the VelaUX addon, If you are only CLI users, go to Deploy via CLI
Enable fluxcd addon
Enabling Addon should have been experienced in the installation of KubeVela, like installing VelaUX. In this case, you will learn to enable addon in the UI page.
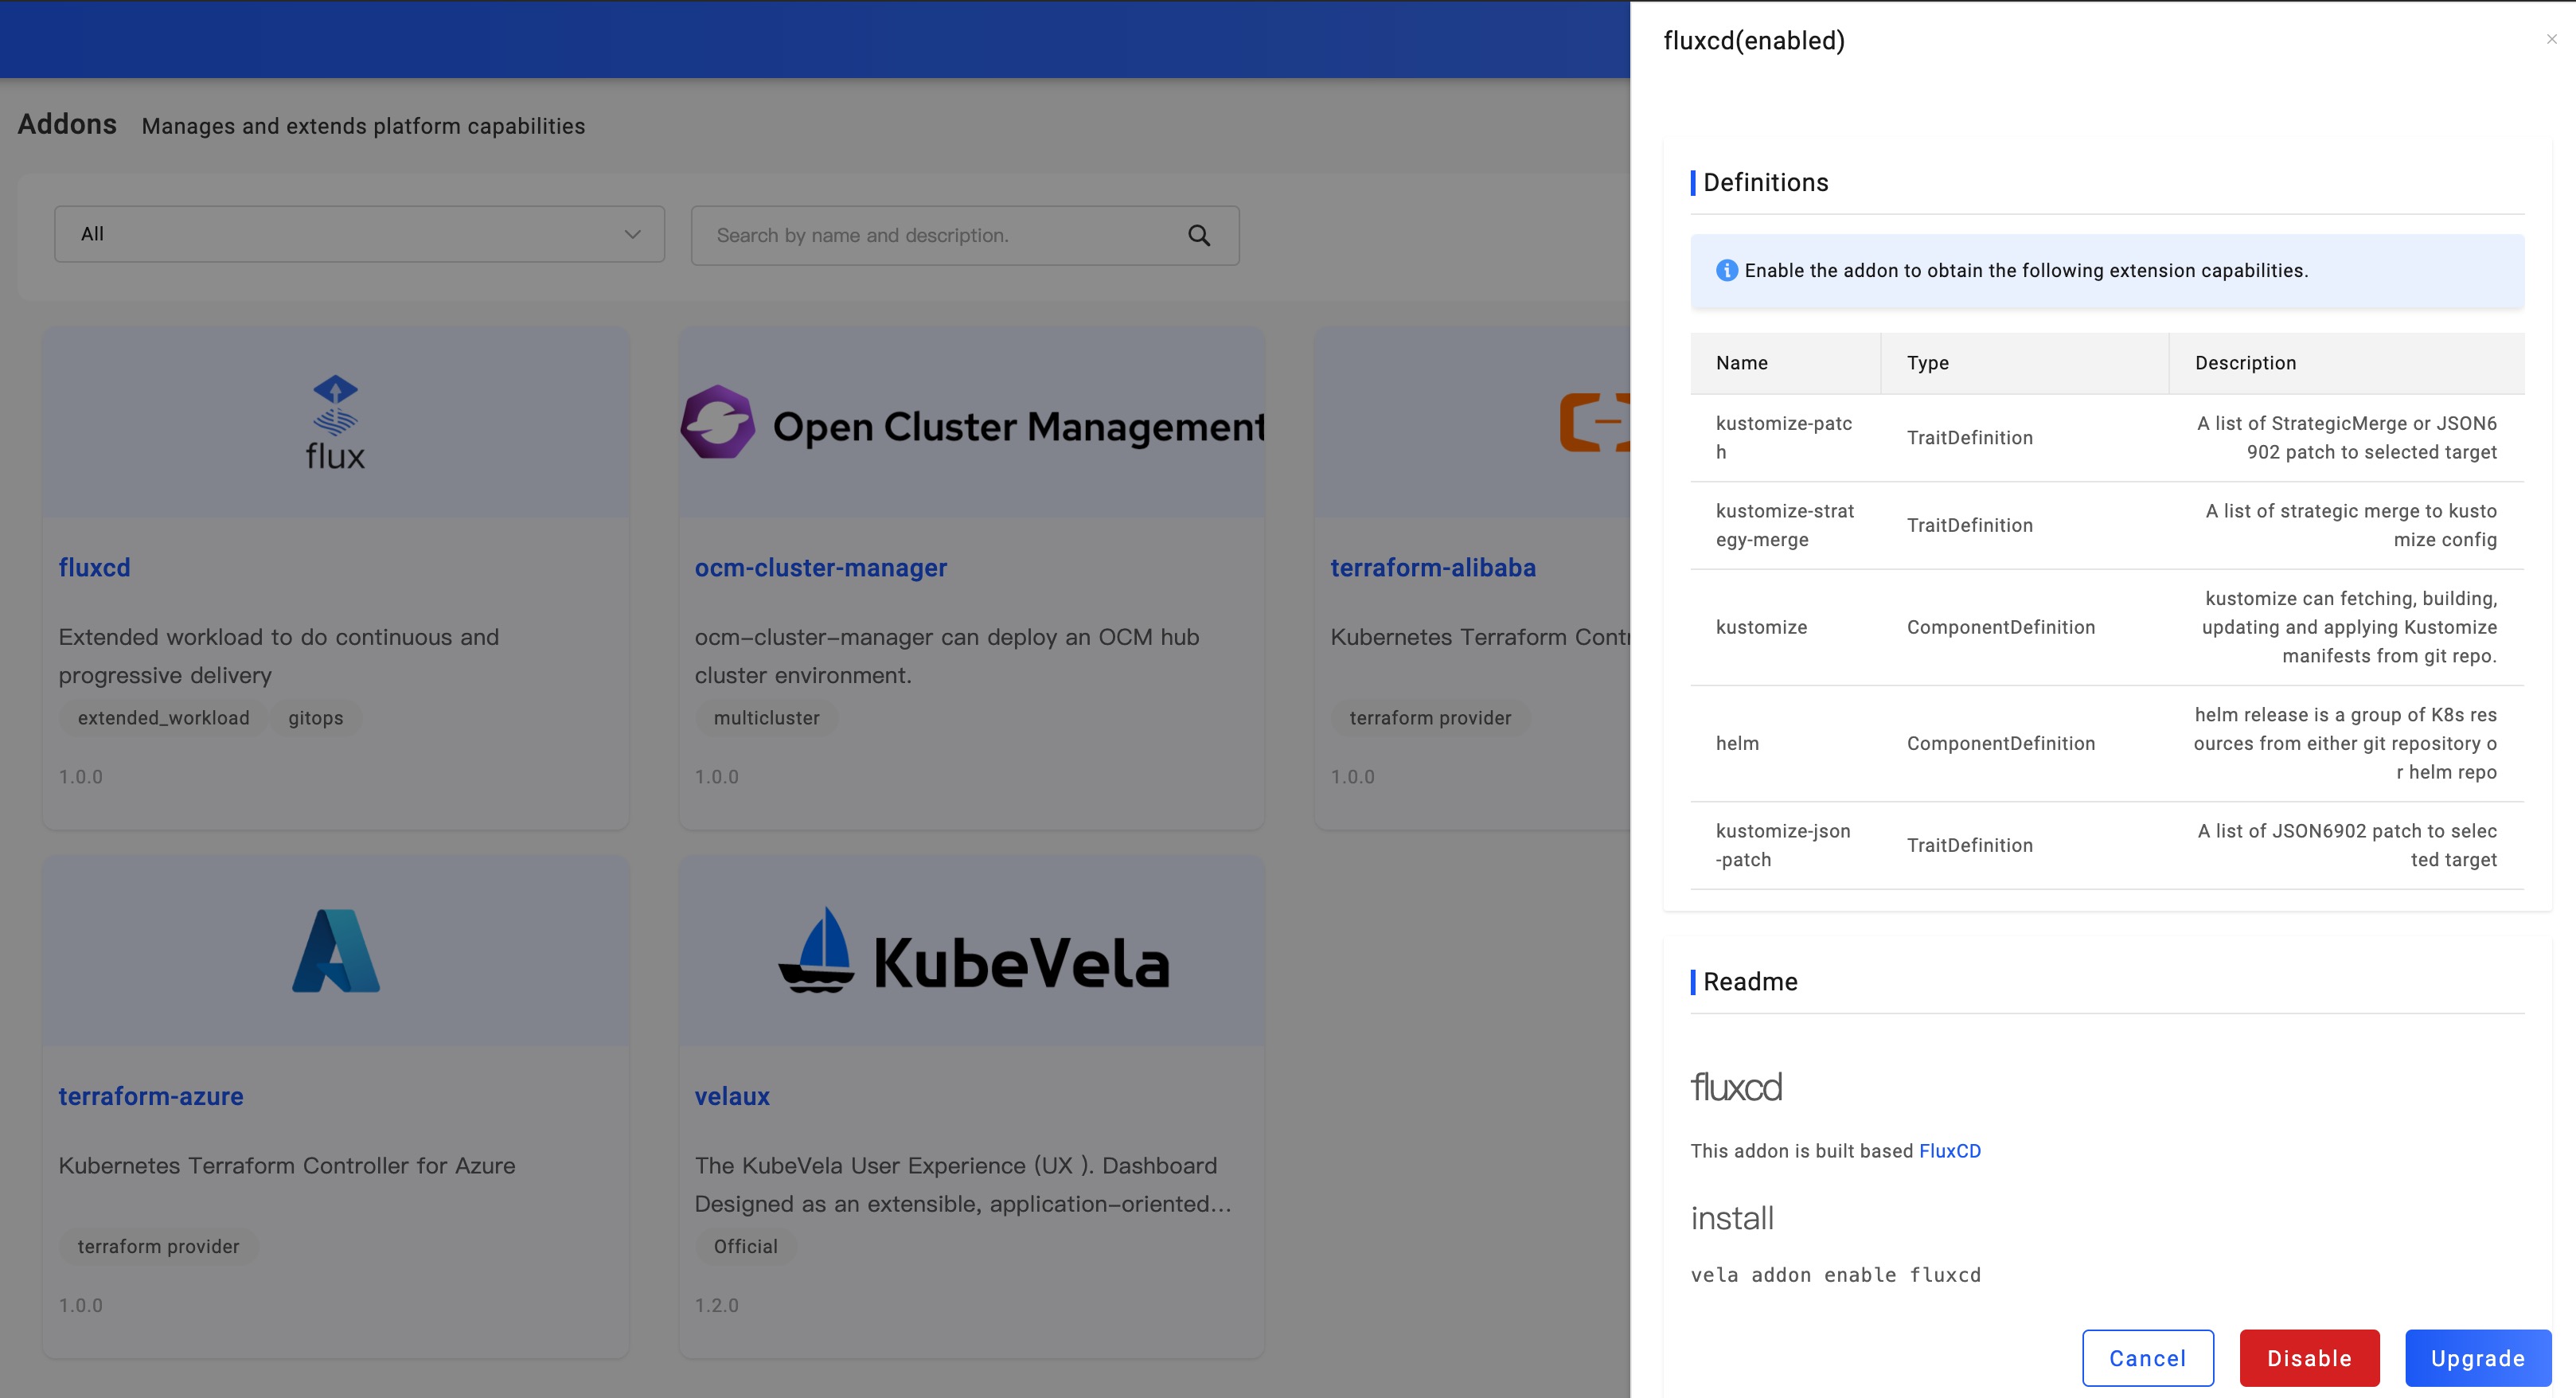
Let's get into the page of Addon. This page will automatically list the community Addons that can be installed. They are all from Official Repo. We click fluxcd to check the details and status of this addon.
From the details, we can know that:
Definitions: The extension capabilities provided by the addon may include component, trait, etc. For the fluxcd addon, it provides two component types,
helmandkustomize, among whichhelmis the type we need to pay attention to and use here.Readme: Addon description, explain the capabilities and related information.
We can click the Enable button. After the fluxcd addon is enabled, it will be installed on all clusters connected to KubeVela, so it will take a certain amount of time.
When the addon is enabled, it means that it's ready to. You can start to deploy Helm Chart.
You can also enable the addon via CLI:
vela addon enable fluxcd
Creating Redis application
You've must have mastered creating applications through the previous sections. When it comes to creating Redis with Helm Chart, all you need is to select type as helm, Then select the Target which has the default StorageClass that provides PV, and at last enter the deployment parameter configuration page.
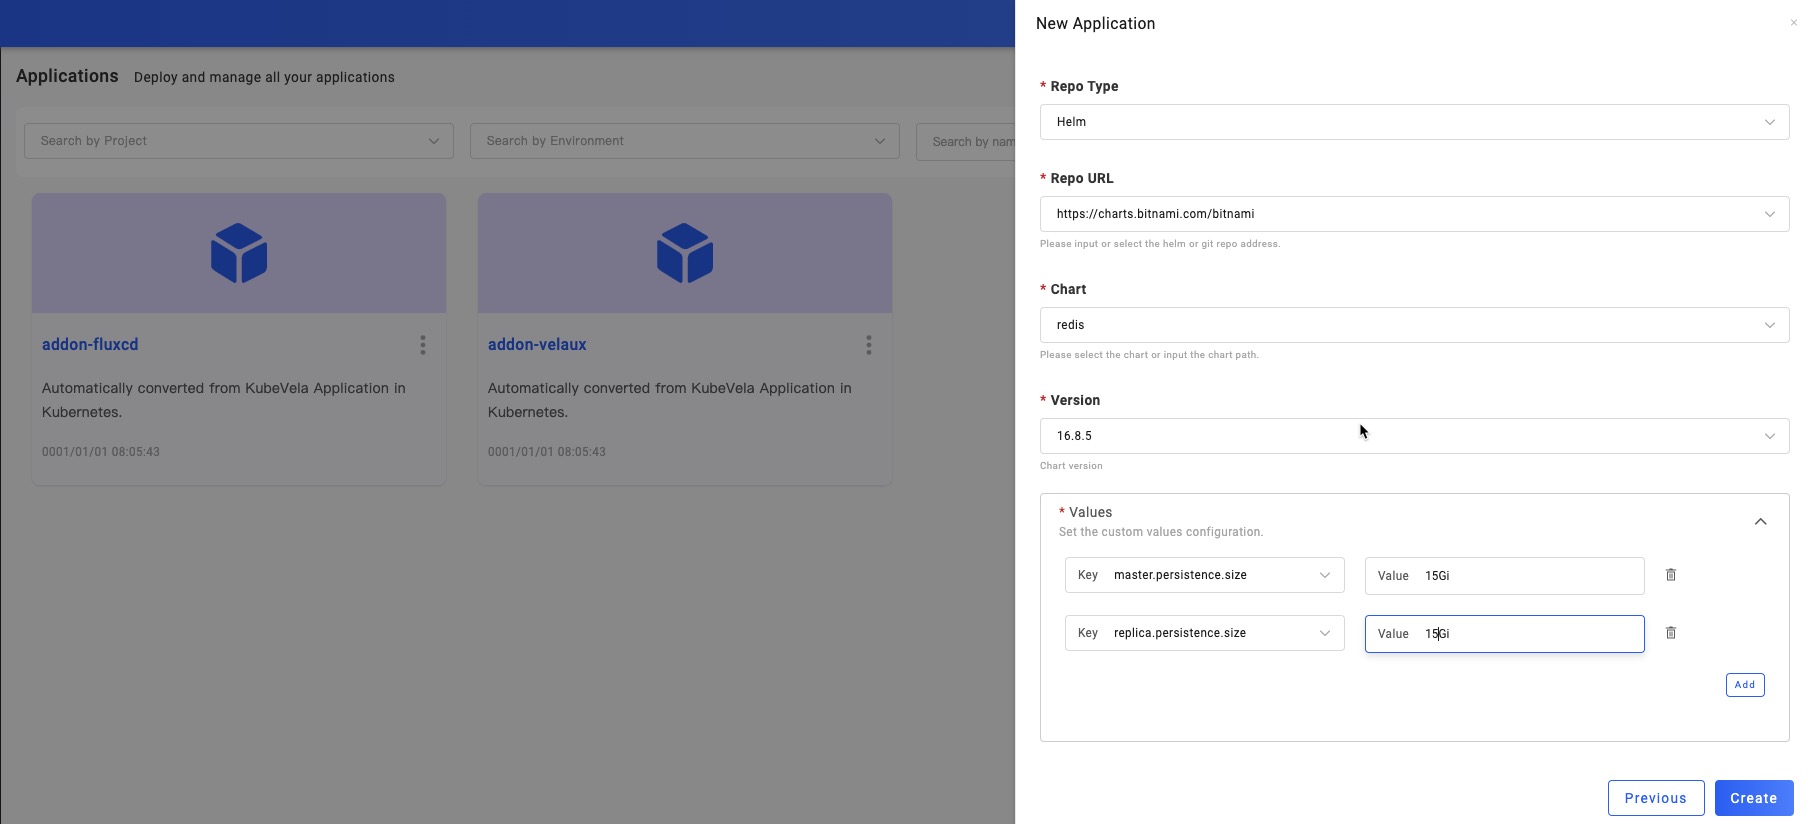
As shown, you need to do the following configuration:
- Repo Type: Git and Helm are supported. In this example, we choose Helm.
- Repo URL: Fill in the repo address you needed. we type in: https://charts.bitnami.com/bitnami. If you have configured the helm repo in Integration you can choose the repo directly.
- Chart: After fill Helm repo URL, will list all available charts in this field. You can choose one from the list, here we choose: redis.
- Version: After choose the helm chart, will list all available versions in this field. Choose one version of this chart, here we choose: 16.8.5.
- Values: After choose the version, will list all parameters of this helm Chart. Since we are using ACK cluster in the example, PV has a minimum capacity requirement, 15Gi. In the same way, other parameters can also be configured according to your cluster's status.
After filling in the above parameters, click Create to complete the application creation and enter the application configuration page. The following steps will stay the same as you've learned in Deploy First Application.
Modify deployment parameters
Clicking the component name, you can open the component configuration page. For the Helm Chart component, we can set the Values configuration options to change the application deployment parameters. the Values configuration options are generated by values.yaml, you can set the custom value for every option.
After modifying the deployment parameters, the workflow of the environment must be executed to make the modified parameters take effect in the specified environment. Due to the existence of Revision, the configuration parameters will be saved in each historical version.
Deploy via CLI
You can also create the application with helm component via CLI:
apiVersion: core.oam.dev/v1beta1
kind: Application
metadata:
  name: helm-redis
spec:
  components:
    - name: redis
      type: helm
      properties:
        repoType: "helm"
        url: "https://charts.bitnami.com/bitnami"
        chart: "redis"
        version: "16.8.5"
        values:
          master:
            persistence:
              size: 16Gi
          replica:
            persistence:
              size: 16Gi
Deploy this application:
vela up -f https://kubevela.io/example/applications/app-with-chart-redis.yaml
Currently, The application created by CLI will be synced to UI, but it will be readonly.
Next, check the deployment status of the application through vela status helm-redis
About:

  Name:         helm-redis
  Namespace:    default
  Created at:   2022-04-21 17:19:12 +0800 CST
  Status:       running

Workflow:

  mode: DAG
  finished: true
  Suspend: false
  Terminated: false
  Steps
  - id:n1gxswwina
    name:redis
    type:apply-component
    phase:succeeded
    message:

Services:

  - Name: redis
    Cluster: local  Namespace: default
    Type: helm
    Healthy Fetch repository successfully, Create helm release successfully
    No trait applied
At this point, Helm Chart in KubeVela is no stranger to you, go ahead and try more!