GitOps with FluxCD
In this section, we will introduce how to use KubeVela to deliver in GitOps mode.
Please make sure you have enabled the fluxcd addon.
Watch the Git repositories and sync automatically
Preparing the configuration repository
GitOps will automatically synchronize the configuration in the repository to the cluster. First, we need a repository that stores all the configuration files you need: such as some Kubernetes native resources Deployment, Secret, ConfigMap, etc. Also, you can store KubeVela's Application in the repository.
Suppose in our repository, there is a folder called infrastructure, which has a KubeVela Application called server and a ConfigMap called server-config.
The directory structure of the repository is as follows:
├── infrastructure
    ├── server-config.yaml
    └── server.yaml
Deploy the following KubeVela GitOps application:
apiVersion: core.oam.dev/v1beta1
kind: Application
metadata:
  name: infra-gitops
spec:
  components:
  - name: database-config
    type: kustomize
    properties:
      repoType: git
      # replace it with your repo url
      url: https://github.com/FogDong/KubeVela-GitOps-Infra-Demo
      # replace it with your git secret if it's a private repo
      # secretRef: git-secret
      # the pull interval time, set to 10m since the infrastructure is steady
      pullInterval: 10m
      git:
        # the branch name
        branch: infra
      # the path to sync
      path: ./infrastructure
Check the status of this GitOps application:
$ vela status infra-gitops
About:

  Name:         infra-gitops
  Namespace:    default
  Created at:   2022-06-30 14:52:33 +0800 CST
  Status:       running

Workflow:

  mode: DAG
  finished: true
  Suspend: false
  Terminated: false
  Steps
  - id:dgatat8jag
    name:database-config
    type:apply-component
    phase:succeeded
    message:

Services:

  - Name: database-config
    Cluster: local  Namespace: default
    Type: kustomize
    Healthy
    No trait applied
As you can see, the GitOps application is running successfully. At this point, the application continuously pulls the configuration from the repository and syncs across the cluster at 10-minute intervals.
Looking at the resources in the cluster, you can find that the server Application and the server-config ConfigMap have been automatically deployed.
$ vela ls
APP             COMPONENT       TYPE        TRAITS  PHASE   HEALTHY STATUS      CREATED-TIME
infra-gitops    database-config kustomize           running healthy             2022-06-30 14:52:33 +0800 CST
server          server          webservice          running healthy Ready:1/1   2022-06-30 14:52:35 +0800 CST

$ kubectl get configmap
NAME                                             DATA   AGE
server-config                                    1      2m58s
Watch the image repositories and synchronize automatically
GitOps can also watch your image repository, get the latest image version, and update the configuration in your code repository with the latest version, so as to achieve the purpose of automatically updating the image.
Suppose the directory structure of our repository is as follows:
├── application
    └── my-app.yaml
The my-app.yaml in the application is as follows:
apiVersion: core.oam.dev/v1beta1
kind: Application
metadata:
  name: my-app
  namespace: default
spec:
  components:
    - name: my-app
      type: webservice
      properties:
        image: nginx # {"$imagepolicy": "default:image-gitops"}
Note that there is a
# {"$imagepolicy": "default:image-gitops"}comment after the image field. KubeVela will update the corresponding image field through this annotation.default:image-gitopsis the namespace and name of the GitOps application component we will deploy.
Deploy the following KubeVela GitOps application:
apiVersion: core.oam.dev/v1beta1
kind: Application
metadata:
  name: image-gitops
spec:
  components:
  - name: image-gitops
    type: kustomize
    properties:
      repoType: git
      # replace it with your repo url
      url: https://github.com/FogDong/KubeVela-GitOps-Infra-Demo
      # replace it with your git secret, GitOps will update the files in your repository with the latest image, which requires write permission
      secretRef: git-secret
      pullInterval: 1m
      git:
        # the branch name
        branch: image
      # the path to sync
      path: ./application
      imageRepository:
        # replace it with your image url
        image: ghcr.io/fogdong/test-fog
        # if it's a private image registry, use `kubectl create secret docker-registry` to create the secret
        # secretRef: imagesecret
        filterTags:
          # filter the image tag
          pattern: '^master-[a-f0-9]+-(?P<ts>[0-9]+)'
          extract: '$ts'
        # use the policy to sort the latest image tag and update
        policy:
          numerical:
            order: asc
        # add more commit message
        commitMessage: "Image: {{range .Updated.Images}}{{println .}}{{end}}"
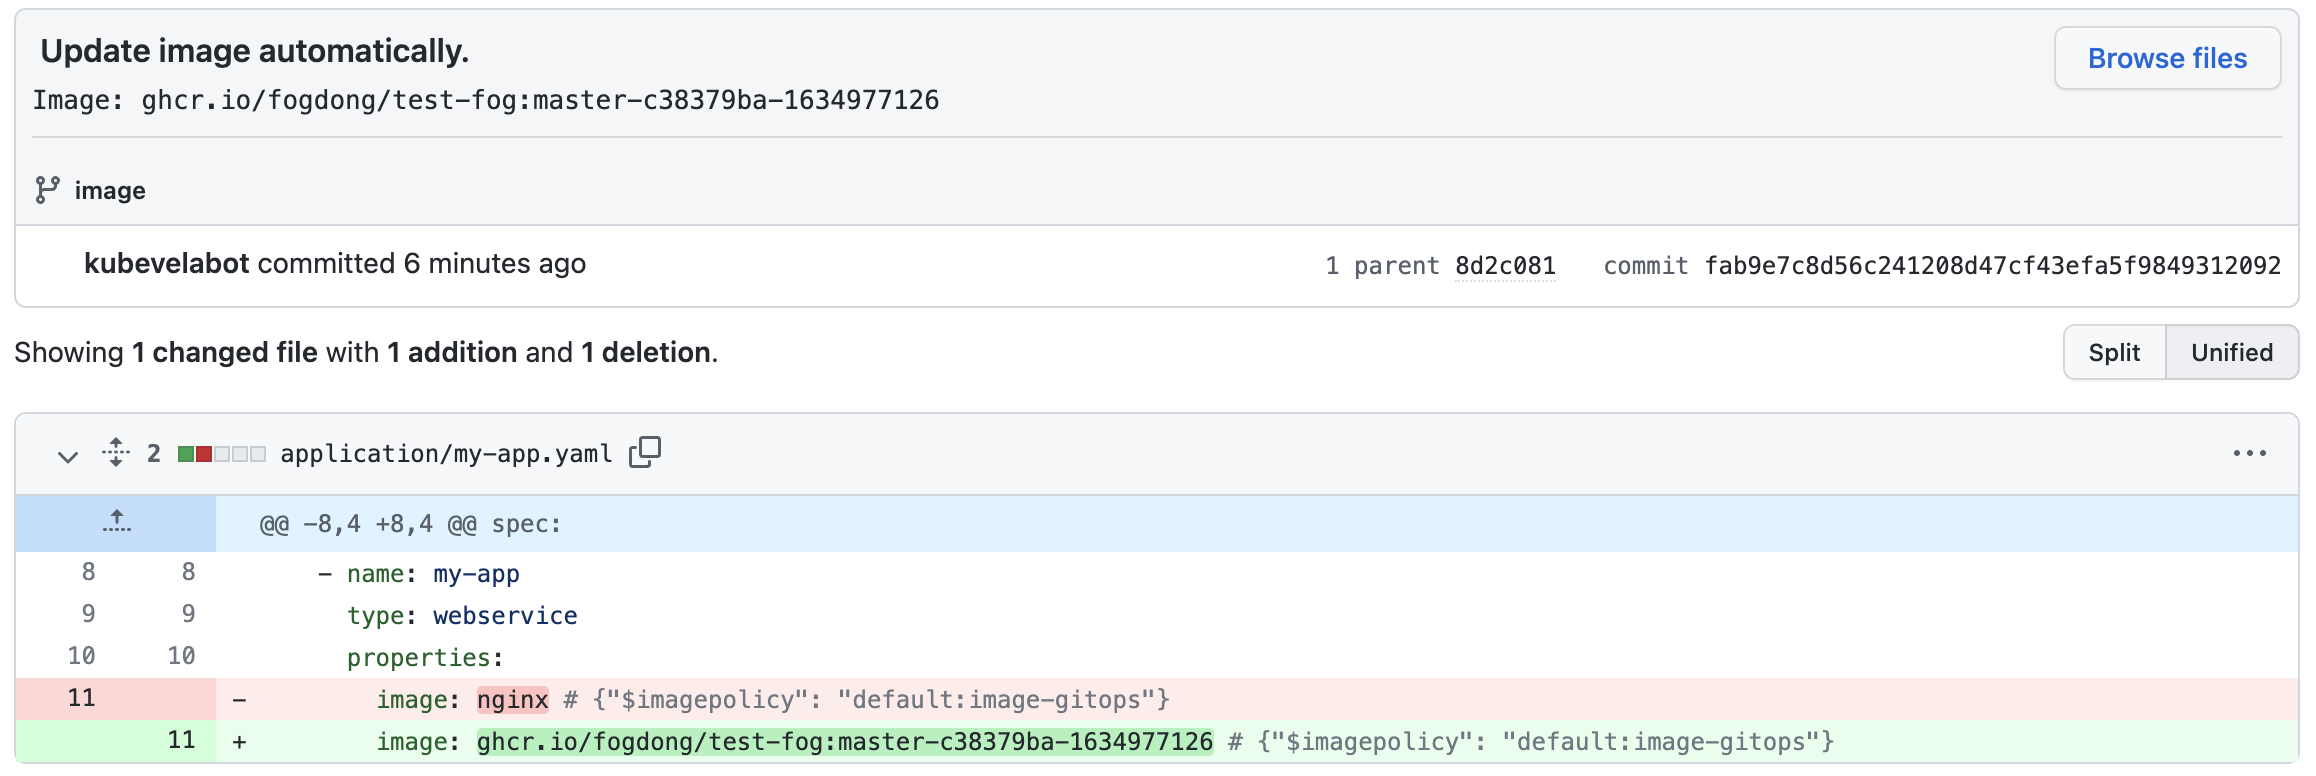
After the application is deployed successfully, you can see that the my-app application has also been automatically deployed. At this point, the image in my-app is nginx:
$ vela ls
APP             COMPONENT       TYPE        TRAITS  PHASE           HEALTHY     STATUS      CREATED-TIME
image-gitops    image-gitops    kustomize           running         healthy                 2022-06-30 15:16:30 +0800 CST
my-app          my-app          webservice          running         healthy  Ready:1/1  2022-06-30 15:16:31 +0800 CST
After a period of time, the imageRepository we configured will automatically pull the latest image we want and update the application image in the repository.
At this point, you can see a commit from kubevelabot in the config repository, which replaces the nginx image with the latest image from our own repository. Commits are prefixed with Update image automatically.. You can also append the information you want in the commitMessage field with {{range .Updated.Images}}{{println .}}{{end}}.
Note that if you want to put the code and config in the same repository, you need to filter out the commit from KubeVela in CI configuration like below to avoid the repeat build of pipeline.
jobs:
 publish:
   if: "!contains(github.event.head_commit.message, 'Update image automatically')"
Re-check the Application in cluster, we can see that the image of the my-app has been updated after a while.
KubeVela polls the latest information from the code and image repo periodically (at an interval that can be customized):
- When the Application file in the Git repository is updated, KubeVela will update the Application in the cluster based on the latest configuration.
- When a new tag is added to the image registry, KubeVela will filter out the latest tag based on your policy and update it to Git repository. When the files in the repository are updated, KubeVela repeats the first step and updates the files in the cluster, thus achieving automatic deployment.
FAQ
How to control Application version in GitOps
Every time the spec of Application differs, the Application will re-run its workflow to deploy. If you want to strictly control the Application runs with your expected version, you can use Publish Version. With it, you can also viewing the history revisions, checking the differences across revisions, rolling back to the latest succeeded revision and re-publishing past revisions.
If you're using external policy or workflow in your Application, then your Application spec may not change if you have updated your policy or workflow. In this case, you can also use Publish Version to force re-trigger the deploy.
If you want to control the Application version in GitOps, you need to update the Publish Version in the Application in your CI to trigger the deploy.
Before update the PublishVersion, you need to setup a initial PublishVersion in your Application like:
metadata:
  name: my-app
  annotations:
    app.oam.dev/publishVersion: <initial version>
You can checkout the example repo or setup the CI workflow to update it automatically like below:
name: Auto Commit
on:
  push:
    branches:
    - '*'

jobs:
  run:
    name: Auto Commit
    runs-on: ubuntu-latest
    steps:
      - name: Checkout repo
        uses: actions/checkout@v2

      - name: Update publish version
        id: update
        run: |
          VERSION=${GITHUB_SHA::8}
          echo ::set-output name=VERSION::${VERSION}
          # replace app.yaml with your app file name
          sed -i "s|app.oam.dev/publishVersion: .*|app.oam.dev/publishVersion: $VERSION|" app.yaml

      - name: Commit changes
        uses: EndBug/add-and-commit@v7
        with:
          default_author: github_actions
          add: '.'
          message: "[ci skip] deploy from ${{ steps.update.outputs.VERSION }}"
          signoff: true
          # specify the branch you want to commit if need
          # branch: main
This CI will use GitHub SHA as the PublishVersion and update it every time when you push to the branch. Note that this is an example of updating PublishVersion in GitHub Action, if you're using other CI tools, you can setup the CI like above.
More
You can also check out GitOps blog and video practice to better experience and use GitOps.